Saturday 29 December 2012

Top Furniture Projects for 2012

Having only started this blog in November I don't have many projects to choose from, but I wanted to look at the best of 2012.


Bird On A Stool which was made and finished by my 12 year old son, Justin is a favourite.
 

And My Take On The Union Jack Craze as I was so pleased with how it turned out and it had the most views of any of my projects.


Wishing you and your family good health and great happiness in 2013.
 
 
If you don't want to miss future posts, go to the right sidebar and subscribe by email or to follow. Make my day and LIKE us on


Sharing With:


Friday 14 December 2012

PB Inspired Christmas Ornaments

I messed up.  Yup, I was so excited to participate in my first Knock Off link party that I didn't read the instructions properly (another newbie mistake).  I went online and found something that I wanted to use for inspirtation, bought a few supplies and rounded up the rest from our house.  I went full steam ahead and finished it and then went to post.  As I wrote the name of the link party, I realized that it was Holiday Knock Off Decor Party and I hadn't made anything holiday decor-ish.  Back to square one and only a few days left....

I came up with these two Pottery Barn ornaments that are about $17 each for inspiration.

 
Off to the dollar store and down to my basement I went for supplies (in a family of boys you would think I could find some old toys, but no, nothing).


I bought two plastic cars, drilled a very small hole in the middle of each and screwed in one of the eye things you put on the back of pictures to attach the wire to hang them with. I then gave them each two coats of spray paint and left them to dry. next I threaded the ribbon through the eye hooks. I used my finger and white glue, covering a one to two square inch area and then putting glitter on and repeating the process and left them to dry.

I found a spare piece of square wood dowling stuff (this is not the term to use if you go to buy this in the lumber store unless you want them to laugh at you). I cut some small pieces off and painted them to look like gifts and hot glued them on the back and this is what I came up with...even my kids and husband were impressed!


If you don't want to miss future posts, go to the right sidebar and subscribe for free by email or to follow. Make my day and LIKE us on Facebook pin us above.


Sharing with:


Monday 10 December 2012

Bird On A Stool

My 12 year old son and his brother, Matthew, both made a stool like this at a wood working course a couple of years ago.  (See Matt's stool HERE).  It sat in our basement unused until now.  He has been watching me refinish furniture and blog and I finally convinced him to work on it.  I Googled some pictures for inspiration and he set to work.


First he sanded it smooth.


Then he stained it using Special Walnut colour.


Then we found a bird image online, enlarged it to the size we wanted it and printed. We cut the bird out and he put in on the stool and traced around using chalk.


We were going to use homemade chalk paint, but we found the exact colour of paint he wanted in artist acrylic paint and it only took one good coat to cover it.  After we left it to dry overnight two coats of polyacrylic were applied with a light sanding with 220 sandpaper in between.

I hope you agree the finished product is something to be proud of. 


Before


If you don't want to miss future posts, go to the right sidebar and subscribe by email or to follow. Make my day and LIKE us on
Facebook


Linking to:

The Rustic Pig                                                                    The Pin Junkie
A Pinch Of Joy                                                                     The Shabby Creek Cottage


Wednesday 5 December 2012

Dollar Store Christmas Word Tree


I'm always looking for little crafty things to do which don't take much time or money. I bought three packages of plain wood words and simply painted and added some glitter I had on hand. Hanging from branches from my neighbours tree (shush, don't tell them) they add a little touch of sparkle to our Christmas decor


Here's a close up of the words


If you don't want to miss future posts, go to the right sidebar and subscribe by email or follow. Make my day and LIKE us on Facebook


Sharing With:


Thursday 29 November 2012

Dollar Store Gift Boxes

Inspired by Debbiedoo's Dollar Tree Christmas Link Party I headed out to Dollarama (Toronto's equivalent to The Dollar Tree).  I found these great wooden boxes for $2 each and thought they would be perfect to wrap gifts in because they could be used over and over again.


The first one I wanted to be able to use again any time of the year so I stained the main box with Special Walnut, including the inside.  I then topcoated it with two coats of polyacrylic.  Don't worry if you get a bit of stain on the "ribbon" you can just use sandpaper to sand it off.


Next I painted the ribbon with an antique white, but in future I would skip this step as it wasn't necessary and who wants to make extra work for themselves?  I then used my finger to spread white glue on the "ribbon" and sprinkled epsom salt onto it.  I left it to dry overnight and now I have a elegant, sparkly gift box.  (total cost $2 for the box, everything else was left over from past projects).
 
For the next red and silver box I used some leftover homemade red chalk paint which I had used on my Union Jack Trunk to paint the box.  I topcoated the box inside and out with polyacrylic in satin finish.  Inexpensive silver paint from Dollarama dressed up the ribbon and when dry I used white glue and silver glitter again from Dollarama to create some drama.  ($2 for the box, $1 for the glitter, $1 for the silver paint = $4 total with supplies left over for future projects).


If you don't want to miss future posts, go to the right sidebar and subscribe by email or follow.  Make my day and Like us on Facebook


Sharing With:


TDC Before and After


Debbiedoo's 
shabby creek cottage
Crafty Confessions
BWS tips button


Saturday 3 November 2012

My Take On The Union Jack Craze

Can you take another Union Jack project?  I know I am late to jump on the band wagon, but my excuse is that I've just gotten back into refinishing furniture and to justify the Union Jack, my husband is English and I did live there for three years so I think it's okay.

I found this trunk in the garbage and managed to cram it into the back seat of my car to haul it home.  My husband is great, but he is fed up with me sending him out in his van to pick up garbage which I have "discovered".


old crate garbage free
 
 
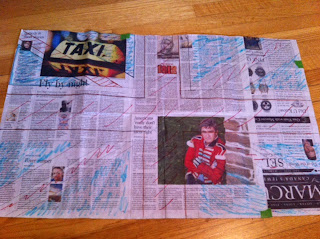
We pulled out so many nails and tacks I thought we would never be finished, but finally it was no longer a dangerous weapon, instead just an ugly old wooden box.  I sanded it all over, stained the sides with Colonial Oak coloured stain and then did a lot of research to make sure I had the Union Jack right.  I measured out the size of the top onto newspaper and drew out my Union Jack.  It took a few times to get it right, but doing it on paper made it so much easier later.


 I painted the entire top white with homemade chalk paint and when dry I placed my pattern on top and I traced it out.  The newspaper print came off just enough so it left a mark to show me where I had to put my tape (I use Frog tape because although it costs quite a bit more, it doesn't bleed).  I mixed some red and blue homemade chalk paint using the little bottles of acrylic craft paint from the dollar store and then painted away.  When it was dry I distressed it a bit and then covered it with two coats of polyacrylic on the sides and three on the top.  I added some Special Walnut colour stain and urethane all in one to the top and rubbed it off to age it.  We also removed the small, old wheels which I thought might damage our soft pine floors and replaced them with locking rubber ones from Home Depot.  I'm so pleased with the result, now we have a great coffee table with storage for my husbands record collection.
 
 
refinished crate union jack


If you don't want to miss future posts, go to the right sidebar and subscribe by email or follow. Make my day and LIKE us on Facebook 


Featured At:

Friday 2 November 2012

A Great Crate

Sometimes you just get lucky.  You're walking along killing time while your son's at swim practice and suddenly when it's not even garbage day, you see an old crate by the curb!  An old crate which is exactly what you have been looking for and have been to auctions trying to buy to no avail and there it is, plain as day, waiting for you to haul it back to your car.


free old crate


Now to make it look pretty. First I scrubbed it and used wood cleaner on it and then I lightly sanded it just to get rid of any rough spots.  Then I stained it with special walnut.  A couple of coats of polyacrylic satin finish and it was ready for it's new job of holding my husbands records.


refinished stain crate
 
 
Here is the Before and After together...I hope you like it as much as I do!
 
 
before and after crate


If you don't want to miss future posts, go to the right sidebar and subscribe by email or follow. Make my day and LIKE us on Facebook


Sharing With:
Funky Junk Interiors                        Crafty Scrappy Happy #22              I Gotta Create #38
The Rustic Pig                                 Common Ground # 126                   The Pin Junkie #3
French Country Cottage                  The Thrifty Groove                          A Little Knick Knack
Debbiedoo's                                      A Humble Creation #9                    Lamb Around
Nifty Thrifty Sunday #95                The Chicken Chick #21                   Alderberry Hill
The Dedicated House #36               An Original Belle #65                      A Pinch of Joy
Life On Lakeshore Drive #22         Homemaker On A Dime #98           Serendipity And Spice #211
If It's Not Baroque #6                      Elizabeth and Co                              Savvy Southern Style
Embracing Change                          Made In A Day                                The Shabby Creek Cottage


Featured At:

TheRusticPig              ThePinJunkie